Families normally enroll themselves through your school's website, but you can enroll any student directly from the Admin panel — no application or open enrollment required. The Enroll student action registers the student for a term and enrolls them into classes and programs in one step.
The student must already exist as a contact with the Student role — see Managing Contacts.
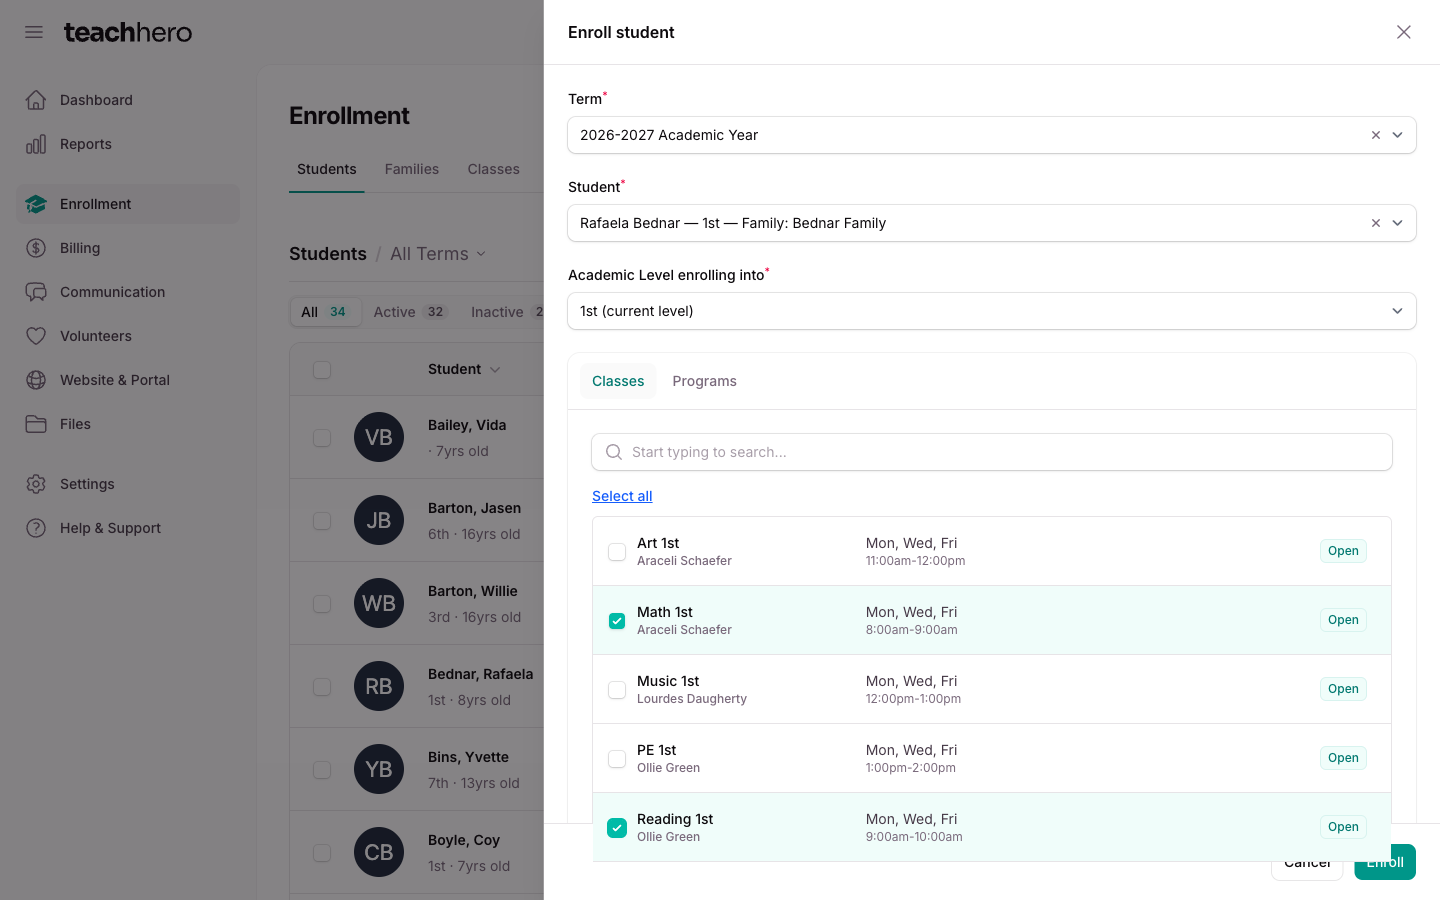
Enroll a student
- Go to Enrollment → Students tab.
- Click Enroll student.
- Choose the Term.
- Choose the Student — the list shows each student's current grade level and family.
- Choose the Academic Level enrolling into — you can pick the student's current level or one level above or below it.
- Use the Classes and Programs tabs to check everything the student should be enrolled in. Only classes and programs in that term that the student is eligible for — by the chosen level, by their age, or because there's no restriction — are listed, along with their teachers, meeting days, and status badges. You can also leave both tabs empty to register the student for the term only.
- Leave Bill the standard fees checked to bill the family, or uncheck it to enroll without charging anything.
- Tick Hold as draft if you want to review the charges before the family sees them. The box only shows while Bill the standard fees is checked — see Holding an invoice below.
- Pick a Payment plan if the family is paying in installments, or leave it on Pay in full.
- Click Enroll.
TeachHero registers the student for the term first, then enrolls them in each selected class and program. Enrolling in a program also auto-enrolls the student in the program's bundled classes that they're eligible for by level or age.
Note: Unless you tick Hold as draft, the charges go straight onto the family's invoice for the term and count toward what the family owes at once.
Billing the enrollment
Three fields on every admin enrollment form decide what the family is charged:
- Bill the standard fees — checked by default. The standard fees on the term, classes, and programs are billed, minus any automatic discounts, onto the family's invoice for the term. Uncheck it to enroll the student without billing anything: no invoice, no fees, no discounts. Use it for a scholarship student, a charge you've already collected, or an enrollment you'll bill by hand later.
- Hold as draft — off by default, and shown only while Bill the standard fees is checked. When you tick it, every charge from the submission goes on one draft invoice that stays hidden from the family until you publish it.
- Payment plan — the plan the family pays this term on. It defaults to Pay in full, and fills in with whatever plan the student is already on for that term, so adding a second class never re-plans the family by accident. The field is hidden when the term has no payment plans, or when Bill the standard fees is unchecked.
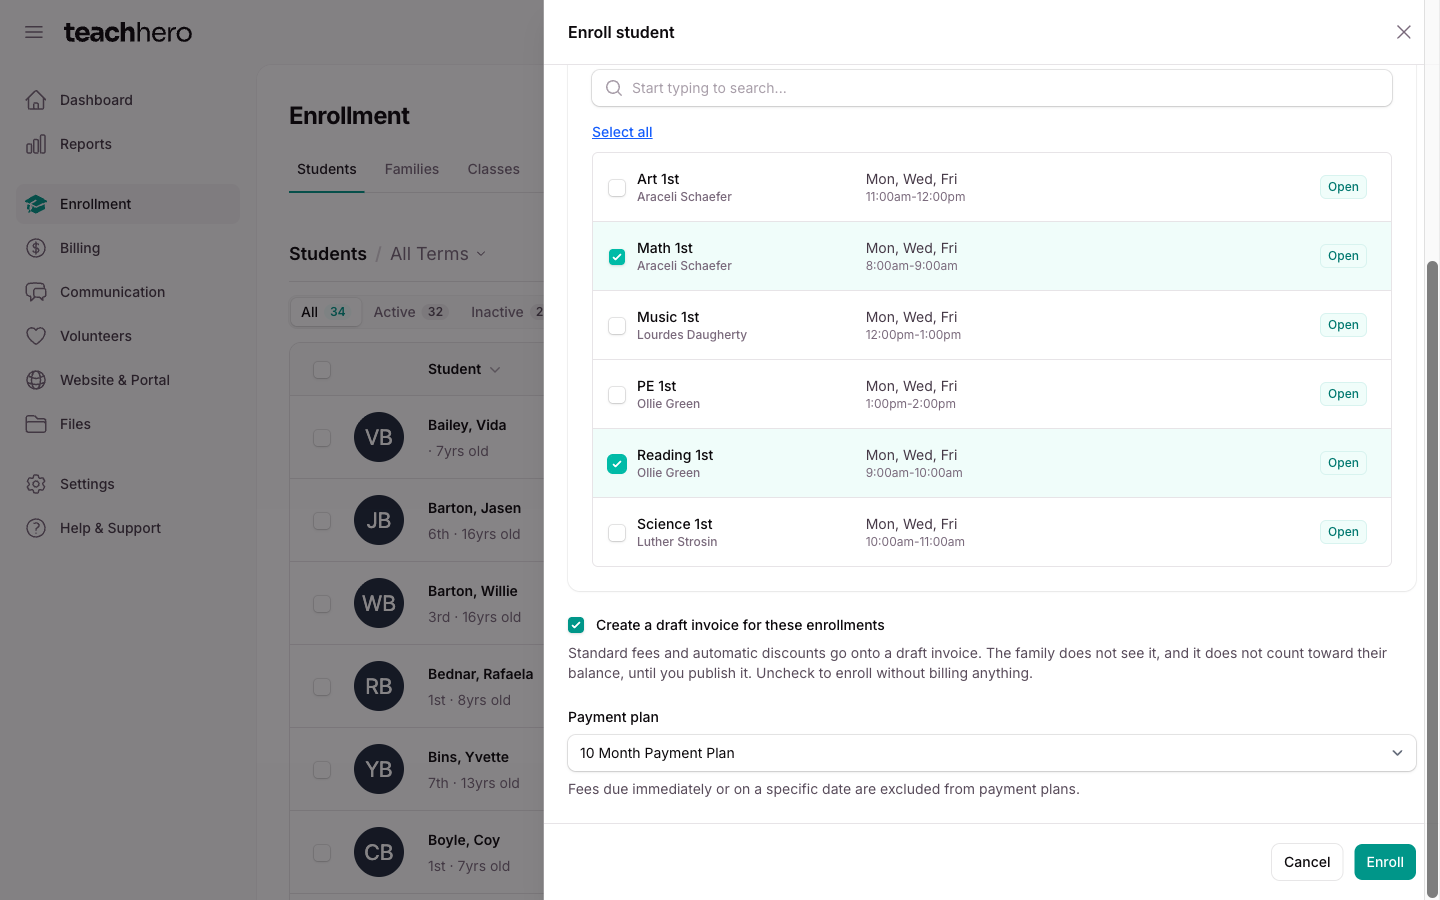
The plan belongs to the student and the term, so every later enrollment into that term bills onto the same schedule. Fees due immediately, or on a specific date, are never part of a plan — they're billed separately. See Payment Plans.
What admin enrollment does
- Fees are billed at once. All fees and automatic discounts on the term, classes, and programs land on the family's invoice for the term. It shows in the family's portal and counts toward what the student owes at once. Tick Hold as draft to keep it hidden until you publish it, or uncheck Bill the standard fees to skip billing altogether.
- Restrictions are bypassed. Admin enrollment works even when enrollment is Closed or Full, when the student's level or age isn't eligible, and before an enrollment period opens.
- Welcome emails are sent. If the class or program has a welcome email turned on, the family receives it — see Automatic Enrollment Email.
- Conflicts are caught. If two selected classes meet at the same time (or clash with a class the student is already in), you'll see a "Schedule conflict" message and nothing is saved until you remove one.
- The student becomes active. Students enrolled in a term count as actively enrolled students for your plan. Each plan has a limit on actively enrolled students, and the Enroll student button is disabled once your school reaches it; move up a plan to enroll more (see Plans & Pricing).
Note: If some selections can't be completed (for example, the student is already in one of the classes), the rest still go through and the notification lists what was skipped.
Holding an invoice
Online enrollment and admin enrollment both put the charges on the family's invoice straight away. If you want to check the charges before the family sees them, hold the invoice.
While enrolling: tick Hold as draft on the enroll form. The charges go on one draft invoice that the family can't see and that doesn't count toward what they owe. Open it, adjust anything the family shouldn't be charged on its Charges table — see Invoices — then click Publish at the top of the page.
After enrolling: hold an invoice that's already out.
- Go to Billing → Invoices and search the student's name, then open the invoice.
- Click Manage in the invoice's header and choose Hold. A held invoice stays out of the family's portal and out of what they owe until you click Publish.
- Adjust the charges, then click Publish.
The Draft pill on Billing → Invoices counts every held invoice in the school, so nothing you held for review gets forgotten.
If you picked a payment plan on the enrollment form, the payment dates are already scheduled on the invoice.
Enroll from a class or program
You can also start from the roster: open a class or program, go to its Students tab, and click Enroll student. This enrolls one student into that specific class or program, with the same Bill the standard fees, Hold as draft, and Payment plan fields.
For a class, the student must already be registered for the class's term. If they aren't, the error message includes a button that takes you to the term's Register Student page — choose the student and their academic level, set the billing fields, and click Register. Then enroll them in the class.
Note: Enrollment forms bill the term's standard charges as you've configured them — there's no per-student fee editing here. To adjust what one student owes, edit their invoice afterwards; see Invoices.