The navigation sections of the Design page control the menu visitors see at the top of your school website, the links families see in the parent portal sidebar, the social links in your website footer, plus the colors of the navigation bar and the parent portal sidebar.
Go to Website & Portal → Design and scroll past the colors, fonts, and logo to the Top Navigation section. After making changes, click Save changes at the bottom of the page, then use View site in the header to check the result.
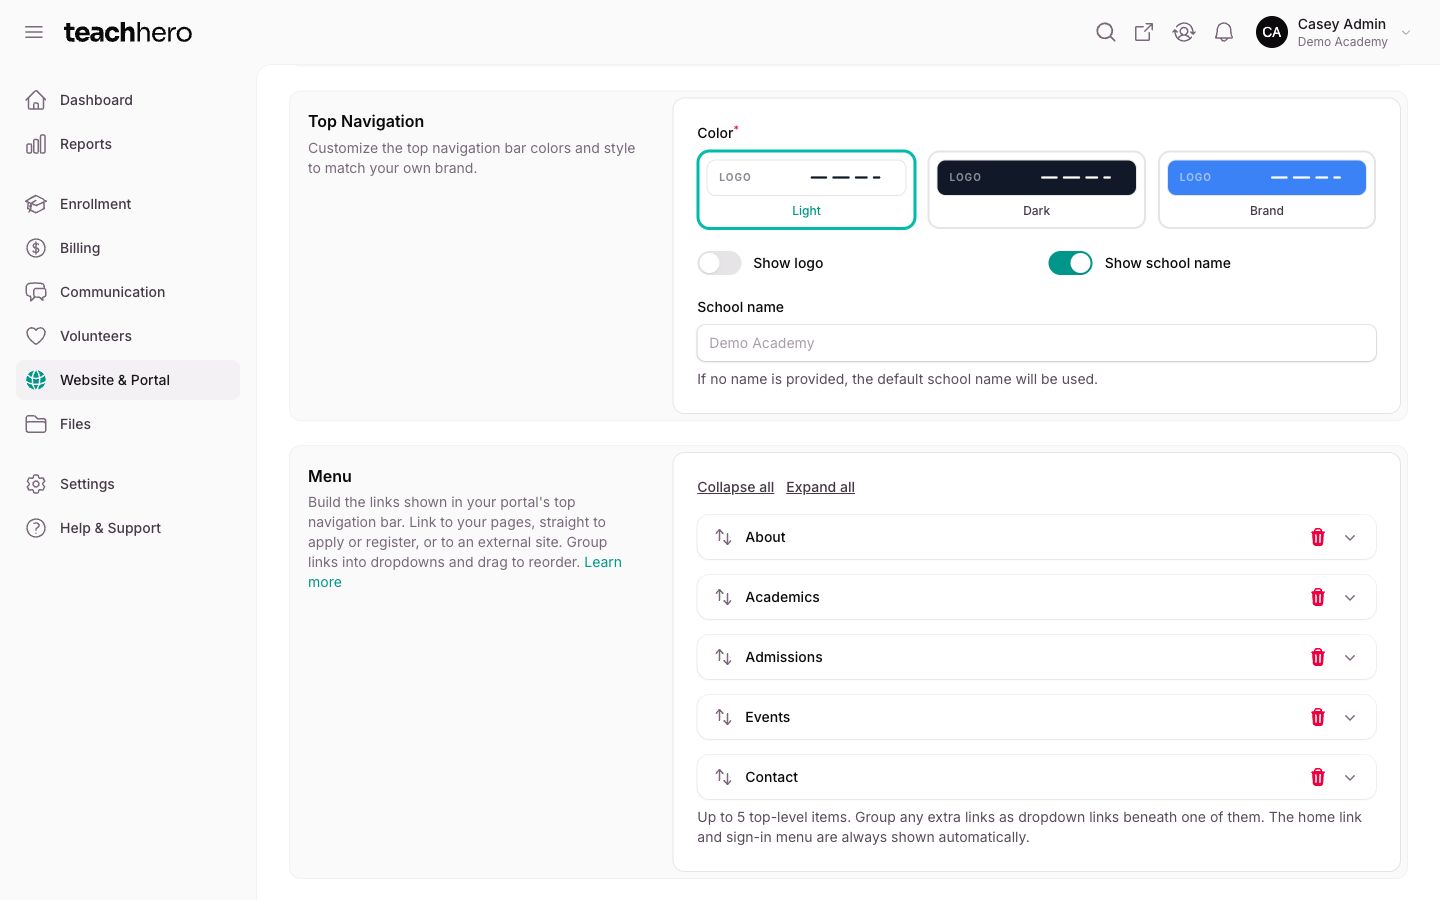
Style the top navigation bar
In the Top Navigation section:
- Pick a Color for the navigation bar.
- Turn on Show logo to display your school logo in the bar. Upload an image under Use a different logo if you want a different one than your main School Logo — otherwise the default is used.
- Turn on Show school name to display your school's name. Type a different name in School name if you like; if left blank, your default school name is used.
Build the menu
In the Menu section, build the links shown in the navigation bar. Link to your pages, straight to apply or register, or to an external site, group links into dropdowns, and drag items to reorder them.
The first time you open this page, the menu is pre-filled from your existing website pages.
- Click Add menu item.
- Choose a Type:
- Apply for admission — opens your student application page, with your admission instructions and application fee. Leave Label blank to use "Apply", or type your own.
- Register for a term — opens the registration page, which lists every term families can register for. Leave Label blank to use "Register", or type your own.
- Portal page — pick one of your website pages under Page. Leave Label blank to use the page title, or type your own.
- External link — enter the URL (e.g.
https://example.com) and a Label. Turn on Open in new tab if you want the link to open in a new browser tab.
- Drag items to reorder them.
- Click Save changes.
Note: The menu holds up to 5 top-level items. Group any extra links as dropdown links beneath one of them. The home link and the sign-in menu are always shown automatically — they don't count toward the limit.
Group links into a dropdown
Any top-level item can hold a dropdown of extra links:
- Expand a menu item.
- Under Dropdown links, click Add dropdown link.
- Set up each link the same way as a top-level item (portal page or external link).
- Drag dropdown links to reorder them, then click Save changes.
Style the portal sidebar
In the Sidebar section, pick a Color for the sidebar families see inside the parent portal.
Choose the parent portal menu links
In the Parent portal menu section, choose which links families see in the portal sidebar after they sign in. Every link starts on.
- Turn off any link families shouldn't see: Billing, Classes, Enrollment, Messages, Family, Forms, Files, or Volunteer.
- Click Save changes.
Turning a link off does more than hide it from the sidebar — it also closes the pages and actions it opens. A family following an old link sees a short "Unavailable" page instead.
The Enrollment link reaches the furthest: turning it off closes self-enrollment everywhere. The enroll buttons disappear from your public class and program pages, and schedules, checkout, registration, and waitlist sign-ups close. You can still enroll students yourself from the admin panel — see Enrolling a Student.
Note: The Home, Help, and Website links always show. To close the whole portal at once instead, see Turn the Parent Portal On or Off.
Add social links
Link families to your school's social profiles. Each one you fill in shows as an icon in the footer at the bottom of every public website page, linking to that profile.
In the Social links section, you can add a link for Facebook, Instagram, YouTube, TikTok, X, and Bluesky:
- Paste the full URL of a profile into the matching field — for example,
https://facebook.com/yourschool. - Leave any platform blank to hide its icon.
- Click Save changes.
Only the platforms you fill in appear in the footer, and they always show in the order listed above. Use View site in the header to check how they look.